Thursday, July 14, 2011

Milk buns

I'm baking buns and breads these days. Breads and buns are well served as breakfasts and suppers for my elder son. I owe my thanks to my bread maker, which helps me do the kneading and first rise job. Without my BM, I don't think I would make that many buns and breads, because:
- my arms would be really hurt from kneading and there would be no way I could still sit here typing this after all the kneading :).
- I wouldn't have enough time to do all the process as my daily schedule is pretty tight with 2 little kids always needing their mother's attention, and then my work requires time too.
Back to the milk buns. They were so very good. No, not just good. They were amazing. They were soft, fluffy and great-smelling. I don’t think anyone can resist that aroma of newly baked breads and buns. Even when the buns hadn’t been ready to get out of the oven, the wonderful aroma filled up the whole room.
My bread maker my great helper. It was bought at a discounted price

The below recipe is originally from here. It’s indeed a keeper.

Ingredients:
- 150ml milk
- ½ egg (beat an egg and use 1/2)
- 30g caster sugar
- 5g salt
- 250g bread flour
- 5g instant yeast
- 40g unsalted butter, room temperature
I always used butter to grease the pans/tins. But I've just bought this. It makes the greasing become much faster, and I think it helps save money too
Method:
1. In the BM’s pan, put the ingredients in this order: milk, egg, sugar, salt, flour, yeast (yeast should not touch the liquid). Choose “Dough” then let the cycle complete (my BM takes 90 minutes).
2. Punch down the dough to let out the air bubbles. Divide the dough into 7 equal pieces. Let the dough rest for 10-15 minutes.
3. Roll each piece of dough round. Arrange them in a well-greased 20cm round cake tin: one piece of dough in the center, and 6 around. Cover and let the dough proof for about 35-40 minutes.
After 2nd rise...
Some milk ready to be brush over the buns
4. Bake in a preheated oven at 190oC for 30-35 minutes. My oven seemed to be too hot, so the surface of the buns got pretty brown after 15 minutes. I covered with a sheet of foil and let it be baked for another 15 minutes (30 minutes in total). Now the small buns stick together to make a big bun, which looks like a cute chubby flower. I just wanted to pinch it because it looked so lovely :). By the way, the bun was a bit over-brown, but my family like it that way, because the crust was crispy (thin though), but the inside was still really soft and fluffy, not dry at all.
Cute, cute...
So soft and fluffy and delicious
5. Take the bun out of the tin right away. Let cool on a wire rack.

Update: My younger son, who is quite “hard” on food (mind you, he’s still very little :)), seemed to like this bun too. He ate a couple of slices, which is really a compliment to me :).

Another update: Only one piece of the bun was left the next morning. I ate it and it was surprisingly good with obvious buttery flavor.

Will I bake this again? Definitely yes.

Saturday, July 9, 2011

Chocolate spritz cookies

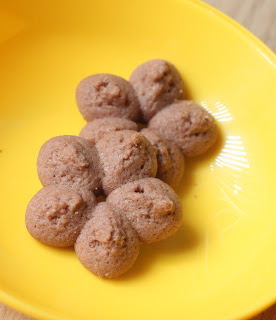
It was written in the manual booklet that this was star shape. To me, it looks completely like a flower

Cookies in perfect shapes, especially when served during holidays, are a great attraction to everyone, even those who normally don't like cookies. That was the reason why I bought a cookie press, quite a long time ago, after having seen rows of beautifully shaped cookies.

Anyway, being among those who aren't so into cookies, I had delayed using it until recently. Another reason for the delay was that there were too many "tips" out there, that made using a cookie press did seem like a complicated job. And mind you, I’m not so confident in baking, so it took me a long time to decide to try out my own cookie press.

To be on the safe side, I used the very recipe that was included in the cookie press box. The chocolate version was chosen because my elder son, like any other boys, loved anything chocolate.

I read that to make the cookie press work, an ungreased flat tray, which must also NOT be the non-stick type, should be used. Oh my, I don't have anything like that. All I have are: 1. a tray that was included with my old oven, which was definitely not flat with some ridiculous and unnecessary decorations; 2. a Chicago Metallic's old jelly roll pan, which is non-stick (of course – because it’s a jelly roll pan). What should I do? I decided to go with what I have and see how things would turn out.

Making the cookie dough and shoving it into the cookie press were no hard work. The "frightening" part was to press the dough into the tray, carefully enough so the cookies would hold shape. I chose a simple flower disk to use with the cookie press. Surprise! Pressing the dough out was nowhere near the difficulty that almost everyone talks about. You just press the handle, release it, hold the cookie press still for half a second, pull it straight up. Voila! You'll see your perfectly shaped cookies. Sometimes the dough pressed out is not perfect because it sticks to the cookie press, just gather the dough to the bowl to spoon into the cookie press again.

So that was what I do with my oven's tray. It was not flat but the cookies were alright. Now it's the non-stick tray's turn. I put the tray in the freezer and the cookie press full of dough in the fridge, both for 5-10 minutes (while baking the first batch). I thought that would make it harder for the butter in the dough to melt, resulting the cookies holding shape better. Seemed like my guess was right. I had no problem pressing the dough into the non-stick tray. Phew!

What I have to say here is, you don’t have to buy a new aluminum tray just to bake cookies using your cookie press. A non-stick jelly roll pan, which I think is popular in most of the kitchens, works well too. Just don’t grease it and don’t line it with parchment paper and it should be fine. It’s even simpler than baking cookies using the rolling-and-cutting method, right? :)

The recipe I used, as stated, is from the booklet in the cookie press box. It’s a surprisingly good recipe and the cookies taste great, in store-bought style, just much better.

- 1 cup (2 sticks) of unsalted butter, at room temperature (225g)
- 1 cup granulated sugar (200g)
- 1 egg
- 2 TBSP milk, or water.
- 2 ½ tsp vanilla extract
- ½ tsp salt
- ¼ cup of unsweetened cocoa powder (24g)
- 2 ½ cups all-purpose flour, sifted (337g)

Method:
1. Preheat oven to 375F (190C)
2. Combine butter and sugar in a large bowl. Using an electric mixer set on medium speed, beat until light and fluffy.
3. Beat in the egg, milk, vanilla extract, and salt. Using a spoon, stir in the flour and cocoa powder until well mixed.
4. Pack the dough into the cookie press. Fit with the desired disk design. Press the dough out onto ungreased baking sheet, spacing the cookies 1 inch apart.
5. Bake until lightly golden, about 10-12 minutes (I baked for 10 minutes, turned the tray around, the baked for another 2 minutes). Gently transfer the cookies to wire racks to cool. Sprinkle with vanilla sugar, if desired, or decorate with colored sugars. Store in an airtight container at room temperature for up to 4 days.
          Make about 4 dozen cookies.

I halved the recipe and made quite a lot of cookies. But all were consumed so quickly that I only had 2 left to take pictures (I actually had to ask my son to leave me those 2 cookies :)).