Saturday, September 1, 2012

Apple Cake Tatin' (Upside-down Apple Cake)

This cake is a hit in my family every time I make it. It is basically an apple upside-down cake. The tanginess of Granny Smith apples makes them the best type to be used here. The tangy and chewy apple slices will be coated with the sweet caramel - yum... truly amazing.
Recipe after the jump

Saturday, July 7, 2012

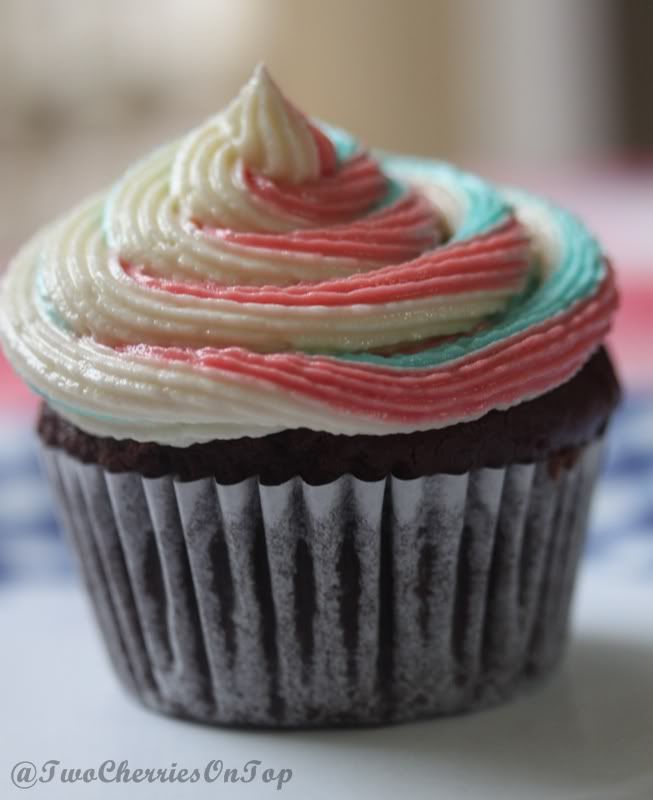
Chocolate buttermilk muffins (cupcakes) with tri-color buttercream frosting

I don't often trust the muffin recipes that tell you to mix dry and wet ingredients in two separate bowls then just combine them. That's because I tried that method for a few times and the results were always tough muffins. I have more confident in the recipes starting with creaming butter and sugar together. But now I've come to realize that maybe I was the one to blame. When folding wet ingredients into dry mixture, it seemed like I always overmixed, and I didn't stop before I got a very smooth batter. Apparently that's not the way. The key here is mixing until just combined, and it's completely fine if the batter is not smooth, because that's the way it should be.

This recipe for chocolate buttermilk muffins is a very good one and I'd like to use it again and again. The muffins are soft and fluffy with fantastic chocolate aroma. They all look cute and neat that they could as well be put in a box to gift someone. Surely the recipient will honestly love the little cakes.

There's one more thing I want to say. I wanted to make the red, white and blue frosting for July 4th. but this was the first time I made frosting and also the first time I used icing colors so my experience in this was close to none. And I also didn't want to use too much color. That was why my frosting didn't look blue and red, but more like cyan and pink. Someone in my family said the frosting looked more like Christmas instead of July 4th. Anyway, the frosting was so delicious that I guess I'll follow that recipe the next time I make buttercream frosting, and the next time, and the next time...

Recipe after the jump

Friday, June 29, 2012

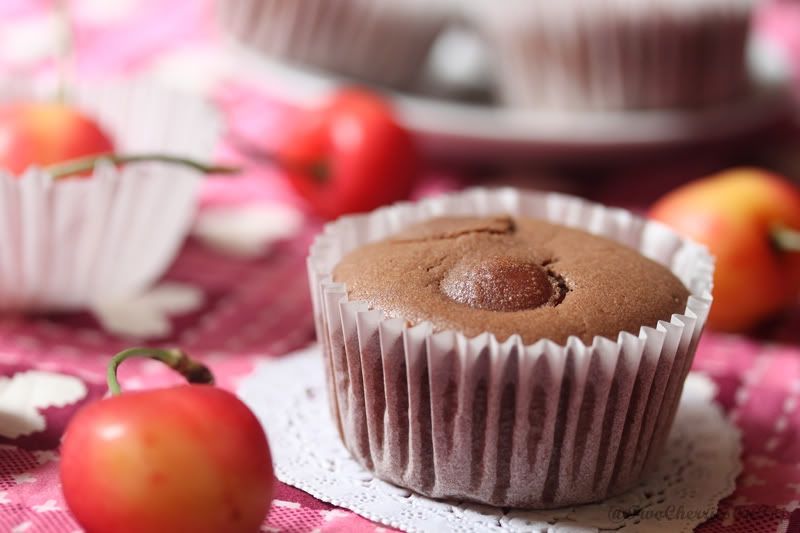
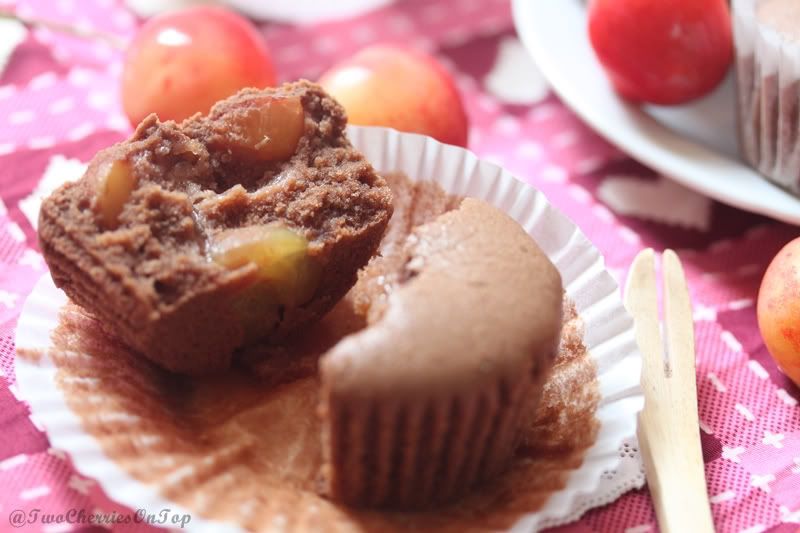
Chocolate cherry muffins

Who can refuse the combination of chocolate and cherries? Absolutely not me. That was why I decided to make these chocolate cherry muffins right when I saw the recipe.
Recipe adapted from Calcherry.

Chocolate Cherry Muffins
Makes 12 medium muffins
 
Ingredients:

• 8 ounces butter at room temperature (227g)
• 3/4 cup sugar (150g)
• 2 eggs, beaten
• 2 cups all-purpose flour (260g)
• 2 teaspoons baking powder
• 1/2 teaspoon salt
• 1/3 cup unsweetened cocoa (28g)
• 1 cup milk (240ml)
• 1 1/3 cups pitted cherries, halved
• 1/2 tsp vanilla extract

Directions:

1. Preheat an oven to 400 degrees F.

2. Cream together the butter and the sugar until fluffy and light. Slowly beat in the eggs, one at a time, and vanilla extract.

3. In a bowl, sift together the flour, baking powder, salt, and cocoa. Add this to the egg mixture along with the milk and mix just long enough to blend the ingredients, no more than 20 seconds.
 
4. Fold in the halved cherries, no more than another 10 seconds.

5. Let rest 10 minutes, then fill greased muffin cups to the brim with the batter.

6. Bake until a toothpick inserted in the middle comes out clean, about 20 to 25 minutes.

7. Remove and let cool 10 minutes before unmolding.

Notes:

1. I used Rainier cherries b/c that was what I had. The fresh cherries were so delicious on their own, but they tasted quite pale in the muffins :(. Anyway, they did add some freshness.

2. I baked the muffins @ 350oF. 400oF seemed too high and I baked for 35'.

3. I put the muffins in the fridge and the next day they tasted like brownies with cherries :). Good.

4. My muffins did not raise very much (so remember to fill the batter up to the brim), maybe that was why they tasted like brownies after staying in the fridge. I did not follow the time limit in step 3 and 4, i.e it took me longer to mix the batter. Maybe that was the reason why my muffins were quite dense?

5. Will I bake these again? Maybe yes, but I'll pay more attention to the time limit and I'll use red cherries. Rainier cherries really should be eaten fresh.

Sunday, June 24, 2012

Indonesian sweet potato soup

I saw this recipe on a site, where the author stated that it was an Indonesian dessert. I tried it and all my family satisfied with the result, so much that I'm cooking it again and again but have never bothered to check if it's really from Indonesia or not :). No matter where its origin is, I still love it.
Sweet soup, [big] tapioca pearls and coconut milk
Recipe adapted from here.
Ingredients:
• 2 medium potatoes, cooked
• About 75g tapioca flour
• 210-230g palm sugar
• 1 liter water


• Coconut milk and a pinch of salt (optional)
• Tapioca pearls (optional)

Directions:

1. Cook the potatoes and mash them while they're still hot. Let cool a bit.
 

2. Add tapioca flour, mix to get a dough that's not sticky and not too dry.
 

3. Roll into small balls about 1-2cm in diameter.
 

4. Bring water to a boil, add palm sugar, stir to dissolve. Gradually and gently drop in sweet potato balls, stir to avoid sticking. The balls are cooked when they float. Bring to a boil again. Turn off heat. Let cool.

5. If you're a cautious mother (like me), you'll also boil coconut milk with a pinch of salt. Let cool. Store in a tight container.

6. If you have dry tapioca pearls, just follow the instructions. If not, you can make them this way: take some tapioca flour, add some water, a little at a time, mix until you have a non-sticky dough. Roll into very small balls. Boil some water, drop in the balls. They're cooked when they float. Spoon them out and drop them into a bowl of cold water at once to prevent sticking. When they're completely cooled, store in a tight container in the fridge.

7. To serve, spoon sweet soup with sweet potato balls into your bowl, add coconut milk and/or tapioca pearls as you want.

The [big] tapioca pearls
Notes:

1. When you add tapioca flour to mashed potatoes or water to flour, always add little by little until you get a nice non-sticky dough. You may have to use more or less flour than the amount stated in the recipe depending on the type of potatoes you have.

2. If you make tapioca pearls yourself, roll them very small. I made them quite big and it took all day to cook.

The purple potato ball - it got its color from the purple sweet potatoes I used. Yellow potatoes will make yellow balls, which are pretty too.
I'm submitting this post to Aspiring Bakers #20: Asian dessert buffet! (June 2012) hosted by Moon of Food Playground.

Saturday, June 23, 2012

Lemon sour cream muffins with lemon icing

The first time I baked a sheet cake with lemon zest, I was so disturbed by the aroma that I promised myself not to bake with anything lemon-y ever again. I even wondered why so many bakers out there seemed to be in love with that scent.

But I seemed to be easily influenced. I saw many recipes, in which people wrote that lemon cakes/ loaves/ bundts were lovely. Even my elder kid said that he loved the scent of fresh lemon zest. Then magazines said that the citrus scent could help reduce stress. So I decided I'd give lemons a second chance. And believe it or not, now I'm one of those who would buy some lemons every time I see them in the supermarkets, because, honestly, I love the scent of lemon zest :).

What I'm trying to say here is, i believe in second chances.


This recipe for lemon sour cream muffins sounds really simple but it got many good reviews. Apparently everyone who has tried it loves it. I decided to add some lemon icing and it felt so right. So if you do give this recipe a try, I recommend you make some lemon icing too, as the muffins have just a small amount of sugar. The lemon icing is tangy and sweet, it goes perfectly with the muffins.

Tuesday, June 19, 2012

Mission failed at a traditional bakery

A while ago, the local TV channel introduced an old bakery where traditional cakes were sold. Not being a fan of traditional cakes but I was interested in it, mostly b/c I'm interested in vintage things and I'm a foodie who always want to explore new places for food.

The first time I tried to find the address mentioned on TV, I failed. There were so many street numbers *the same* as the number stated on TV (strange, isn't it?) and none of them was a bakery. Mission failed, and I felt like I was fooled. Forget it, I told myself.

Recently I happened to hear about that bakery once again. this time I also got to know that it was in a small alley. Keeping my eyes wide open, I could find the bakery this time. Yes, the bakery was true to the words. Several kinds of traditional cakes are sold there. The older people must really like this place b/c there are the cakes that have been so dear to them since they were young, especially the cakes made from some kinds of leaves that the younger generation might have never heard of.
Here it is - the old bakery
Anyway, what I expected most from this bakery was not the cakes but some stories behind the cakes or behind the store. This bakery is much older than me. It was opened around 1940s so there must have been a lot of things to talk about.

When I first stepped in the bakery, what I heard was a old woman, who was the seller, yelling at the phone: "How many [cakes]? Where are you? Remember the delivery fee will be on you too!". Her voice sounded cold and angry and I never knew why b/c it was in the morning and the bakery was not so crowded. So what irritated a woman that early on the morning?
The irritated woman in her bakery
Many mini versions of traditional cakes, which are both cute and good
My donut balls with sesame seeds, 10 for 1USD
Western pieces of cakes. Prices are fair.
After she finished yelling, I said I wanted some traditional donut balls (donuts rounded like small balls with green bean filling) and with quick movements, she put them into a brown bag for me. Thinking this was my chance, I started: "I saw your bakery on TV and...". The irritated woman said nothing and her cold expression didn't change either, which was most likely to mean "I'm not interested, understand? Take your donut balls, pay then leave!". I did. I took some more small cakes, I paid then I left. I wasn't angry at all but I couldn't help but wondering why that woman became so annoyed at customers, whose money would become her salary. Angry - no. But disappointed - yes. So I didn't get any stories out of that woman. Mission failed once again.
The cup that the bakery got for its good quality
Anyway, the donut balls and cakes were good. I still hope that next time when I go to that bakery, I'd see someone else with better attitude who would spare a minute or two for some good old stories about such an old bakery. Or at least, a story about why that woman was so irritated - I'm even all ears for that :).

Saturday, June 16, 2012

Movie review: "Another Earth"

What if there's another YOU out there? Like when you look at the mirror, it suddenly breaks and that YOU in the mirror just step out and you realize that "that YOU" has been a real human in another world all the time. What will you feel? Will you be delighted, or will you freak out? Then after those first intense reactions, what will you do? What will you say to that you? What advice will you give? Or will you just listen to learn from them? To me, the main idea of the movie is like that, but built in a much better story. Our Earth, the only planet we knew that supports life, has been duplicated sometime in its long, long history. Now we know, and even see, another planet, not too far from us, let's call it Earth 2, on which there's life. And what's more, there are us on it too. Everyone of us. There's you and there's me. Now do you want to go there and meet that you? Will it be a good idea or a bad one?

The whole movie "Another Earth" develops from that idea. The thing I don't like about it is that the story moves quite slowly that sometimes you will want to stop it. But if you have time, or you never mind the slow pace, or you're very patient, then you'll find some beautiful and interesting bits in it.

I like the part when the girl named Rhoda, played by Brit Marling, revealed to the musical composer John that she wanted to travel to Earth 2.
John: why do you want to go? You don't know what's out there.
R: that's why I wanna go.
...
R: if no one wanted to travel to the unknown places, then we'd still believe that we are the center of the universe, that the Sun revolved around us.
John: don't we now? We call ourselves earth 1 and them Earth 2. Do you think they [up there] call themselves number 2?
(the quotes above are not exact b/c I wrote just what I remember)

This part really impresses. B/c many times in life, we really still think we are the center, even w/o knowing it. We want others to play by our rules. We set our own standards and we trash others'. And we don't even realize what we are doing. And if we realize that, will we stop?

Another remarkable quote I've got from imdb:

Richard Berendzen: Within our lifetimes, we've marveled as biologists have managed to look at ever smaller and smaller things. And astronomers have looked further and further into the dark night sky, back in time and out in space. But maybe the most mysterious of all is neither the small nor the large: it's us, up close. Could we even recognize ourselves, and if we did, would we know ourselves? What would we say to ourselves? What would we learn from ourselves? What would we really like to see if we could stand outside ourselves and look at us?

Somewhere in the movie, they also said that we as humans actually are talking to ourselves all the time, every day, but we just don't realize that. But now, when that idea of talking to ANOTHER YOU becomes so visible, what will you think? What do you think you will say to that you? For me, I'm wondering if people see themselves as loveable people? Will they want to be friends with themselves? Maybe not many people can answer those questions honestly.

As I said, this movie moves quite slowly so if you are the kind who enjoy action-packed or fast-paced movies, you're not likely to love it. But if you're patient enough, then some gems will be revealed to you through out the movie. Some more information: Ms. Marling, who played the female lead Rhoda, is also the script writer and co-producer. And she's very young. A very admirable girl.

Watch this movie if you have time, and you'll find yourself reflect on your own image after that.

I guess I'll give this movie 7 stars out of 10.

Friday, June 15, 2012

Dedicated to Michael Learns To Rock

It's been forever since I posted on my blog. Time really flies and I don't know what I've done with all that time. Or if I've done too much. I do miss my blog these days and I want to post something, though I don't know if anyone ever reads it :). So I changed the blog's design a little, just to get some inspiration. I made it look simpler, to be exact. Maybe simpler is better. Or, as a slogan of a product that my favorite Chinese actor once was the model for, "simple is cool".

Right when I wanted to post something, I checked the website www.mltr.dk and saw something new. FYI, that's the website of the Danish band Michael Learns To Rock. They've been my favorite band forever. I've listened to their music since I was a high schooler. Now I'm married with kids and I'm still in love with their music. Actually, I'm not a music fan. I prefer movies and books. I'm not really interested in any kind of music. But I love MLTR's songs. Basically because of their simplicity. The tunes are simple and the lyrics are too. But those simple words are incredibly beautiful. And they always, always have some meanings. If you're in the US, you may not know this band, but we in Asia are so familiar with MLTR's lovely songs like "Sleeping Child", "Paint My Love", "That's Why" etc. I grew up listening to those songs, which must have been 10-20 years old. Many years have passed, but until today, I sometimes still find myself humming the tunes of their old songs like "Judgement Day", "Love Will Never Lie", "Complicated Heart", "The Actor" and so on. Sometimes in this busy life, I don't think of them as much as I used to. But MLTR forever has a place in my heart and every time I hear their songs somewhere, I still can't stop smiling. It's so nostalgic and and sentimental to hear their songs sometimes in some stores I walk in. That really brings up a lot of memories and believe me, MLTR's songs always make your walk a little slower so you can enjoy the simple beauties around...


The later songs of MLTR are also very good, like "Take Me To Your Heart" or "Blue Night", but unfortunately I've never had time to listen to them as much as I did with their old songs. I even listened to Jascha Richter's solo album "Planet Blue" (Jascha Richter is the lead vocal of the band) for a while, but as I said, I listened to the songs not much enough to let them remain in my heart like the old ones. You can't believe how much I listened to their old albums. I listened to them all day, all night. Thousands of times, I guess. I remembered every tune and every word in their old albums "Michael Learns To Rock", "Colours", "Played on Pepper", "The Greatest Hits". I love each member of the band too. Jascha, to me, is always the shy guy. A private family man. He's so artist-y and he's the genius, who I've been admiring a lot. I always think that he's the one who loves to stay alone in a room to think and create; and it'd be a sin if anyone tries to disturb him. I don't know if that's true but that's what my imagination tells me. Kaare Wanscher is my favorite type of guys with his lovely smile to everyone. His smile is so bright and it can light up a room. He seems to be friendly, down-to-earth and nice, the one that can bring joy wherever he comes. I read that he's now also working as an advocate. That's amazing. On stage, Kaare is always the one who stays a bit behind because he plays drums. But Kaare, you don't know how much attention you've got, though you always take the farthest place on stage :). Kaare looks like he's always passionate and enthusiastic about what he's doing. I do really love him. Mikkel Lentz, the guitarist of the band, is the cool type. He's so very friendly too and I think the talents come to him so naturally. It seems like he never has to try too hard because he's a natural artist. I mean, it's like he was born with talents. When he plays his guitar, it looks like he puts all his mind, heart and soul into it. I really, really love this trio and I do wish the best for them always. They deserve that.

Back to "something new" that I found on the website of MLTR. They've just released a new video with their new song "Any Way You Want It". If you have time and want something fresh, please head over this address (their official YouTube channel, I think) to see the video: http://youtu.be/mJ_eFOvFeRs
There you can enjoy some great music and, if you want, you will see the three great guys I wrote about. And you may fall in love with Kaare's smile too :).

One of the wonderful things about this video is that there're some images of Nepal, an attractive country to me. I read some bits about this country in the book "Into Thin Air" (Jon Krakauer), one of the best books I've ever read. It's about the disaster on Mt. Everest and Nepal was mentioned a bit. Not much at all, but it did make me feel that Nepal is appealing in a mystical way. Seeing a MLTR's live concert in Nepal? Oh, that should be a beautiful experience. Yes, I saw MLTR-in-concert once (NOT in Nepal of course), a very long time ago, and I do hope to do that once more. Never know if I can see them in person ever again, but let's keep hope alive anyway :).

Monday, October 10, 2011

Butter cake with raisins – the best butter cake recipe


Long time no postings. Family issues have stepped in and required all my attention. I’ve missed the "online kitchen", but sometimes we cannot do everything we want to…

Back to baking…

Shame on me, I don’t even know the difference between a pound cake and a butter cake. Maybe a butter cake recipe calls for more butter? I’m not sure, but I’ve always thought that they are the same: dense and a bit dry. But I have to admit that sometimes I like baking pound cakes because they are not difficult to put together.

Then I happened to see this recipe… What the author at Rasa Malaysia had to say about this butter cake made me eager to bake it. The making seems simple but the result seems satisfying.

And the result was, in fact, really satisfying. I baked it today. The cake looked lovely, and when served warm just out of the oven, it was so soft and fluffy and buttery. It smelled great too. The whole kitchen was filled with butter and vanilla aroma, fantastic.

I baked 2 mini loaves (20cm x 7cm each) and gave one to a poor old lady. So, that loaf warmed my heart too.

Recipe (source):
      -  2 and 1/3 stick (250g) unsalted butter, at room temperature
- 7 oz (200g) plain flour/all purpose flour
- 1 tsp baking powder
- 7 oz (200g) castor sugar (I used 180g)
- 4 eggs
- ½ tsp salt
- 4 tablespoons fresh milk (I used 60g, I didn’t even know for sure if 60g milk is equal to 4 TBSP or not)
- 1 teaspoon vanilla essence
- 1/4 cup raisins + 1 tablespoon all purpose flour (to coat the raisins) (I used 50g raisins, but next time I think I’ll use some more)
Method:
1. Preheat oven to 350°F.
2. Lightly grease the pans with some butter.
3. Mix the flour and the baking powder and salt together and sift.
4. Use an electronic beater to mix butter and sugar until well combined or pale yellow in color. (Note: Sugar has not dissolved yet).
5. Add eggs, one at a time, beat well after each addition.
6. Scrape down the sides for even mixing.
7. Add in vanilla essence and mix well.
8. Fold in ½ flour mixture, and mix well.
9. Add in all the milk then the rest of flour mixture. With a spatula, fold in the raisins. Mix well.
10. Pour the mixture into the greased baking pans. Shake them lightly to distribute cake mixture evenly.
11. Bake until golden brown and cooked, about 45 minutes. Use a cake tester to test if it’s cooked.
12. Remove it from the oven and let cool on the wire rack for another 5 minutes. Serve warm.

Saturday, August 6, 2011

Sweet Juillet apricots

The box, after all the apricots have been eaten, is thoroughly washed and used to hold a couple of pieces of cake :)
This summer marked the first time I saw and knew about sweet Juillet apricots. I've always known the big and tart apricots from the US, which I always use to bake fruit cakes because they're not sweet enough to eat raw.

When first seeing sweet Juillet apricots, I doubted the word "sweet". But the box was just too in inviting so I decided to buy one [box]. There were 7 apricots in every box. The apricots looked very "summery" and clean and they were the same in size. I thought one more apricot cake would be baked.

But of course I wanted to eat one first to know how sweet or how tart this kind of apricots were. And the apricot impressed at the first bite. It was juicy and really sweet, so sweet that I decided that I and my son would eat them all instead of putting them in a cake.
Aren't they beautiful? I have also taken a close-up photo, but something went wrong when I resized it, and it vanished :(
Now I know that this kind of Juillet apricots are only grown in Washington (the US) and only available in July. Such a great kind of fruits. Those sweet Juillet apricots really don't disappoint.

Yes, life gives you apricots, which are sometimes tart and sometimes sweet, beyond your expectation, imagination and prediction, but eventually, life doesn’t disappoint. I do hope so.

Thursday, July 14, 2011

Milk buns

I'm baking buns and breads these days. Breads and buns are well served as breakfasts and suppers for my elder son. I owe my thanks to my bread maker, which helps me do the kneading and first rise job. Without my BM, I don't think I would make that many buns and breads, because:
- my arms would be really hurt from kneading and there would be no way I could still sit here typing this after all the kneading :).
- I wouldn't have enough time to do all the process as my daily schedule is pretty tight with 2 little kids always needing their mother's attention, and then my work requires time too.
Back to the milk buns. They were so very good. No, not just good. They were amazing. They were soft, fluffy and great-smelling. I don’t think anyone can resist that aroma of newly baked breads and buns. Even when the buns hadn’t been ready to get out of the oven, the wonderful aroma filled up the whole room.
My bread maker my great helper. It was bought at a discounted price

The below recipe is originally from here. It’s indeed a keeper.

Ingredients:
- 150ml milk
- ½ egg (beat an egg and use 1/2)
- 30g caster sugar
- 5g salt
- 250g bread flour
- 5g instant yeast
- 40g unsalted butter, room temperature
I always used butter to grease the pans/tins. But I've just bought this. It makes the greasing become much faster, and I think it helps save money too
Method:
1. In the BM’s pan, put the ingredients in this order: milk, egg, sugar, salt, flour, yeast (yeast should not touch the liquid). Choose “Dough” then let the cycle complete (my BM takes 90 minutes).
2. Punch down the dough to let out the air bubbles. Divide the dough into 7 equal pieces. Let the dough rest for 10-15 minutes.
3. Roll each piece of dough round. Arrange them in a well-greased 20cm round cake tin: one piece of dough in the center, and 6 around. Cover and let the dough proof for about 35-40 minutes.
After 2nd rise...
Some milk ready to be brush over the buns
4. Bake in a preheated oven at 190oC for 30-35 minutes. My oven seemed to be too hot, so the surface of the buns got pretty brown after 15 minutes. I covered with a sheet of foil and let it be baked for another 15 minutes (30 minutes in total). Now the small buns stick together to make a big bun, which looks like a cute chubby flower. I just wanted to pinch it because it looked so lovely :). By the way, the bun was a bit over-brown, but my family like it that way, because the crust was crispy (thin though), but the inside was still really soft and fluffy, not dry at all.
Cute, cute...
So soft and fluffy and delicious
5. Take the bun out of the tin right away. Let cool on a wire rack.

Update: My younger son, who is quite “hard” on food (mind you, he’s still very little :)), seemed to like this bun too. He ate a couple of slices, which is really a compliment to me :).

Another update: Only one piece of the bun was left the next morning. I ate it and it was surprisingly good with obvious buttery flavor.

Will I bake this again? Definitely yes.

Saturday, July 9, 2011

Chocolate spritz cookies

It was written in the manual booklet that this was star shape. To me, it looks completely like a flower

Cookies in perfect shapes, especially when served during holidays, are a great attraction to everyone, even those who normally don't like cookies. That was the reason why I bought a cookie press, quite a long time ago, after having seen rows of beautifully shaped cookies.

Anyway, being among those who aren't so into cookies, I had delayed using it until recently. Another reason for the delay was that there were too many "tips" out there, that made using a cookie press did seem like a complicated job. And mind you, I’m not so confident in baking, so it took me a long time to decide to try out my own cookie press.

To be on the safe side, I used the very recipe that was included in the cookie press box. The chocolate version was chosen because my elder son, like any other boys, loved anything chocolate.

I read that to make the cookie press work, an ungreased flat tray, which must also NOT be the non-stick type, should be used. Oh my, I don't have anything like that. All I have are: 1. a tray that was included with my old oven, which was definitely not flat with some ridiculous and unnecessary decorations; 2. a Chicago Metallic's old jelly roll pan, which is non-stick (of course – because it’s a jelly roll pan). What should I do? I decided to go with what I have and see how things would turn out.

Making the cookie dough and shoving it into the cookie press were no hard work. The "frightening" part was to press the dough into the tray, carefully enough so the cookies would hold shape. I chose a simple flower disk to use with the cookie press. Surprise! Pressing the dough out was nowhere near the difficulty that almost everyone talks about. You just press the handle, release it, hold the cookie press still for half a second, pull it straight up. Voila! You'll see your perfectly shaped cookies. Sometimes the dough pressed out is not perfect because it sticks to the cookie press, just gather the dough to the bowl to spoon into the cookie press again.

So that was what I do with my oven's tray. It was not flat but the cookies were alright. Now it's the non-stick tray's turn. I put the tray in the freezer and the cookie press full of dough in the fridge, both for 5-10 minutes (while baking the first batch). I thought that would make it harder for the butter in the dough to melt, resulting the cookies holding shape better. Seemed like my guess was right. I had no problem pressing the dough into the non-stick tray. Phew!

What I have to say here is, you don’t have to buy a new aluminum tray just to bake cookies using your cookie press. A non-stick jelly roll pan, which I think is popular in most of the kitchens, works well too. Just don’t grease it and don’t line it with parchment paper and it should be fine. It’s even simpler than baking cookies using the rolling-and-cutting method, right? :)

The recipe I used, as stated, is from the booklet in the cookie press box. It’s a surprisingly good recipe and the cookies taste great, in store-bought style, just much better.

- 1 cup (2 sticks) of unsalted butter, at room temperature (225g)
- 1 cup granulated sugar (200g)
- 1 egg
- 2 TBSP milk, or water.
- 2 ½ tsp vanilla extract
- ½ tsp salt
- ¼ cup of unsweetened cocoa powder (24g)
- 2 ½ cups all-purpose flour, sifted (337g)

Method:
1. Preheat oven to 375F (190C)
2. Combine butter and sugar in a large bowl. Using an electric mixer set on medium speed, beat until light and fluffy.
3. Beat in the egg, milk, vanilla extract, and salt. Using a spoon, stir in the flour and cocoa powder until well mixed.
4. Pack the dough into the cookie press. Fit with the desired disk design. Press the dough out onto ungreased baking sheet, spacing the cookies 1 inch apart.
5. Bake until lightly golden, about 10-12 minutes (I baked for 10 minutes, turned the tray around, the baked for another 2 minutes). Gently transfer the cookies to wire racks to cool. Sprinkle with vanilla sugar, if desired, or decorate with colored sugars. Store in an airtight container at room temperature for up to 4 days.
          Make about 4 dozen cookies.

I halved the recipe and made quite a lot of cookies. But all were consumed so quickly that I only had 2 left to take pictures (I actually had to ask my son to leave me those 2 cookies :)).

Wednesday, June 29, 2011

Tech in the kitchen: Ctrl-Alt-Delete cup set


They're not the keys from a computer keyboard...
See? I told you they're not keys :D
This is not really a tech gadget. But decoration-wise, it’s just too cute to ignore, especially for someone who loves both the kitchen and tech like me. Maybe I’ll drink from the “Delete” cup when I’ve got some problems and I want them to go away. The “Control” cup will be used in situations that get a bit out of control, or when I need more self-control. The “Alt” cup will be for, well, other situations.

This Ctrl-Alt-Delete cup set is sold @ 11.99USD @ ThinkGeek. Now I'm going to add this set to my wish list :).

Donuts

My elder son likes donuts. In fact, he likes almost every kind of cakes and breads and buns. He used to ask me to buy donuts from bakeries for him. But I did not like that idea because those donuts contain too much oil and I’m not even sure what kind of oil is used or if they [those who make the donuts] use the oil again and again just to reduce the cost. In short, those donuts don’t seem to be healthy at all. So my son kept asking and I kept reasoning and refusing.

Now that I’ve got myself a bread maker and discovered its fantastic ability to make dough, I decided to make a batch of donuts for my son. It’s not difficult to make donuts with the help of a BM, the only disturbing thing is that you’ll have to suffer from the heat when deep frying the donuts. In a summer day when temperature goes up high, and in a small kitchen without an air-conditioner, frying donuts becomes a tough task. Anyway, the way my son enjoyed the donuts made me think that it was all worth it :).

Recipe (from here)

Ingredients: (about 25 pieces with diameter of about 6cm)
- 150g bread flour
- 100g cake flour
- 10g milk powder
- 3/4 tsp baking powder
- 30g sugar
- 5g salt
- 1 3/4 tsp instant dry yeast
- 1 egg yolk
- 70ml cold water
- 70ml cold milk
- 25g melted butter

Sugar for coating:
1/2 cup sugar

Method:
1. Put everything in the bread machine according to what your machine's manual said (normally liquid first, then dry ingredients, then yeast last) and start the dough cycle. Once the dough cycle is complete you can start to shape it.
2. On a floured surface and with floured hands divide dough into 23g pieces and shape it into a ball. Pat it flat to about 1.5cm high and make a hole in the middle of the dough. To make the hole in the middle of the dough, I used a small O shape cookie cutter. You can also use a bottle cap. The dough you cut from the holes could be gathered then be made into some more donuts.
3. Prove the shaped dough for 30 minutes on a greased tray covered loosely with glad wrap in a warm environment.
4. Fill the wok with oil about 2.5 inches deep and fry the dough for 30 seconds on each side or till lightly golden brown. Drain well and pat dry with absorbent paper towel before coating them in sugar.
5. Serve warm.

Notes for those without bread machine:

- Mix all ingredients in a big mixing bowl except butter (do not melt butter but use room temperature butter). Mix well to form a dough.
- Add in the butter and knead into a smooth elastic dough. Prove in a covered mixing bowl for 60 minutes. The rest of the process you can follow step (2) from above.
I know, I know, this picture looks weird. I just want to show the texture of the donuts :)
To play it safe, I fried the donuts to the point that they turned a bit brown (not just light golden brown like the ones at the bakeries). They were soft and good when eating right after that, but they became harder (just a little bit, though) the next day, maybe because I fried them too much :-\. I did not coat them with sugar because I didn’t want my son to eat too much sugar, so the donuts were not too sweet.

Monday, June 27, 2011

Braided bread with your favorite filling

As I’ve always admitted, I love baking but making breads and buns frightened me with the long time for the dough to rest and rise. When Jasmine @ Sweetylicious, who is hosting Aspiring Bakers project for June, chose the theme to be BREAD SEDUCTION, at first, I was taken aback. I did not know what to bake to submit (while I’d love to submit at least one bake). After reading a lot of posts @ many blogs, I realized that in most cases, I could make things easier for myself by letting my bread maker do the kneading and first rise. Now I’m so interested in trying many kinds of breads and buns with the help of my lovely bread maker :).

Of the bread/bun recipes I’ve been collecting, there’s a kind of breads that’s so eye-catching: braided breads. A braided bread looks like a princess on its own. It’s also great because you can have various kinds of fillings. Since I’ve got a block of Philadelphia cream cheese and an opened jar of blueberry preserve (of which one third was used to make blueberry madeleines the other day) in my fridge, I went for braided bread with cream cheese and blueberry preserve filling.

This was the first time I made a braided bread, and actually this was among the first few times I made breads, so I had to read the recipe and instructions very carefully. King Arthur Flour has a great recipe and also step-by-step instruction, which was really helpful. Really understanding the recipe did help, because when making this bread, I realized it was not as difficult as I had thought. Yes, it takes time to do that braiding job, but your efforts will pay up. The result should be a beautiful bread, which looks like a work of art.
Well, my bread may not look like an expensive work of art, because this was my first time, remember? :) But I liked it a lot. This is the only photo I have, taken with my phone, because all the bread was quickly consumed, as dessert, as supper and as breakfast :). That's why I couldn't take a better photo with a real camera.
Recipe (adapted from King Arthur Flour)
Sponge:
  • 85g warm water (I used room temperature water because it’s summer here)
  • 1 teaspoon sugar
  • ½  tablespoon instant yeast
  • 29g AP flour
Dough
  • all of the sponge
  • 85g plain yogurt
  • 57g unsalted butter, softened
  • 1 large egg, beaten
  • 50g caster sugar
  • 1 teaspoon salt
  • 1 teaspoon vanilla
  • 302g AP flour
  • egg wash for brushing braid
Cream cheese filling
  • 70g cream cheese, softened
  • 25g caster sugar
  • 28g sour cream
  • 1 teaspoon fresh lemon juice
  • 15g AP flour
  • 57g blueberry preserve
Sponge
Dough
Cream cheese filling
Directions
In a small bowl, combine the sponge ingredients. Stir well to combine, loosely cover with plastic wrap, and set aside to proof for 10 to 15 minutes.
1) Pour ingredients to the pan of your bread maker, in this order: sponge, yogurt, egg, vanilla, sugar, flour, salt. Choose “dough” program. After 5 minutes, add butter to the pan. Let the cycle complete itself.
2) While the dough is rising, prepare the filling (I made the filling early in the morning and put it in the fridge to use later the same day. Take it out of the fridge about 15 minutes before use so it can soften). Combine all the filling ingredients (except the preserve) in a small bowl, mixing until smooth and lump-free (I did this with a wire whisk). Reserve the filling and preserve until ready to fill the braids.
3) When the bread maker completes the task, take the dough out (with lightly greased hands) and gently deflate the dough. Let it rest for about 5 minutes. Roll it out into a 25x38cm (10x15 in) rectangle. Rolling on parchment paper makes moving the bread to the baking sheet much, much easier. Lightly press two lines down the dough lengthwise, to divide it into 3 equal sections. Spread the cream cheese filling down the center section, and top with blueberry preserve, leaving 1" free on all sides of the filling.
4) To form the mock braid, cut 1" crosswise strips down the length of the outside sections, making sure you have the same number of strips down each side. Beginning on the left, lift the top dough strip and gently bring it across the filling diagonally. Repeat on the other side with the top dough strip, so that the two strips crisscross each other. Continue down the entire braid, alternating strips to form the loaf.
6) Set the braided loaf aside, lightly covered, to rise for 30-45 minutes, or until quite puffy.
7) Preheat the oven to 375°F. Brush the loaf with egg wash (one lightly beaten egg, 2 teaspoons water and a pinch of salt), and sprinkle with coarse sparkling sugar, if desired. Bake for 25 to 30 minutes, or until the loaf’s golden brown. Remove from the oven and cool for 15 to 20 minutes before serving.